On paper, Doom: Eternal is a simple game. Use big guns. Kill all the demons. Rock out like there’s no tomorrow. But id Software’s hilariously metal first-person shooter—which came out last week for PlayStation 4, Xbox One, and PC—is more than meets the eye. By making the most of the game’s various and intricate systems, you can turn Doomguy into Doomgod. The hordes of Hell will wish they took a note from humanity 2020 and stayed the heck at home.
Difficulty settings are (mostly) adjustable.
In Doom: Eternal, there are four difficulty settings. Here’s what the game calls them, from easiest to hardest: I’m Too Young To Die, Hurt Me Plenty, Ultra-Violence, and Nightmare. You can switch between these at any point while you play.
https://kotaku.com/doom-eternal-the-kotaku-review-1842471145
Beyond those standard settings, there’s an even harder one: Ultra-Nightmare. You can’t toggle this setting mid-game. In this mode, enemies are just as tough as they are on Nightmare, but if you die, that’s it. Game over.
It doesn’t matter what you pick for your first weapon mod.
A few minutes into the game, you’ll come across your first weapon mod upgrade. At that point, since you only have the shotgun, you can choose between Sticky Bombs (which turn the ammo into Halo-like plasma grenades) or Full Auto (exactly what it sounds like). Both are fantastic upgrades, but you needn’t agonize over the decision. In Doom: Eternal, weapon mods show up at rapid clip. If you try one and aren’t happy with it, it won’t be long until you can unlock the other one.
It does matter what weapon mods you level up.
Each weapon mod has two tiers of upgrades. The first tier makes each mod a bit more potent—say, increasing the explosion size of Sticky Bombs or boosting your movement speed while using Full Auto. You unlock skills in the first tier with weapon points, which you get by doing what Doomguy does best (returning demons from whence they came).
The second tier is a weapon-transforming augmentation, which is a level-up that could turn an assault rifle into a rapid-fire rocket launcher, for instance. This second tier doesn’t require any weapon points. Instead, to earn the upgrade, you have to complete something called a “mastery challenge.”
Generally, these challenges involve mowing down demons in highly specific ways related to the mod. Maybe you need to kill 25 Cacodemons with the ballista’s Arbalest, or take out five enemies in one go with the chaingun’s Turret (ten times over). The sooner you open up a given mastery challenge, the sooner you’ll be able to use the mod’s final perk. By pouring weapon points into two different mods on the same weapon, you’re kneecapping yourself.
Bonus tip: If you can find a Mastery Token, you can skip any mastery challenge, so long as you’ve purchased the prior set of upgrades.
Level up these weapon mods.
It’s a matter of playstyle and opinion, of course, but the following weapon mods tend to have more powerful final tiers. Pour your weapon points into them first.
Shotgun: Sticky Bombs. It’s not just that Sticky Bombs are a blast (sincerest apologies for the pun). It’s that the shotgun’s other mod, Full Auto, burns through ammo too quickly to be useful in the early game, before you’ve increased ammo capacity.
Heavy Cannon: Micro Missiles. The Micro Missiles mod isn’t so great at first, but completing the mastery turns it into one of the best weapons in the game: a rapid-fire rocket launcher that doesn’t overheat. Get this mod early so you can unlock the mastery as soon as possible.
Plasma Rifle: Heat Blast. Mods for the plasma rifle aren’t as game-changing as some of the other weapon mods, so you can’t really go wrong here. In my experience, Heat Blast is the marginally better option. Completing the mastery challenge unlocks an ability that can supercharge the plasma rifle’s standard ammo, making it a far more deadly weapon.
Rocket Launcher: Remote Detonate. In an early level, I fired off a rocket that, defying every known law of the universe, went directly between a demon’s legs. The chances of that happening are slim; we’re talking mere pixels of distance. Yes, the standard rocket launcher is a fickle beast. But, with Remote Detonation, you have more control. That way, if you shoot a missile and it goes between a demon’s legs, you can just pull the trigger and detonate it, hopefully dealing some serious splash damage.
Super Shotgun: Just upgrade the thing ASAP. “Improvements” is the only mod for the Super Shotgun, and you should pour weapon points into it as soon as you get them. The mastery tier sets the Meat Hook—Doomguy’s unnecessarily metal name for a grappling hook—on fire. Not only does this deal bonus damage to any demon you hit, it’ll also score you extra armor drops. Since unlocking the flaming hook requires a whopping 50 kills, this is a good nominee for a Mastery Token.
Ballista: Destroyer Blade. C’mon. The name alone should convince you to get this one.
Chaingun: Mobile Turret. Before unlocking each mod, you can see a small video showcasing what, exactly, it does. The video preview for the Mobile Turret makes it look like you’re required to post up in one spot—highly antithetical to Doom’s core concept of “move extremely fast at all times.” If the clip gives you pause, don’t worry. Like the mod’s name implies, you can still move just fine.
Do not miss the Slayer Gates.
Throughout Doom: Eternal, you’ll come across six Slayer Gates. These Slayer Gates are optional challenges during which you fight a few waves of increasingly difficult enemies. If there’s just one thing you take from this article, it’s this: Do every single Slayer Gate. Not only are they fun, they also give you some next-level goodies. Completing each Slayer Gate grants you three weapon points—a sizable haul, if your goal is to level every weapon up—plus a shiny trinket called an Empyrean Key. Get all six Empyrean Keys and you’ll be able to unlock the Unmaykr, arguably the most powerful weapon in the game.
Some early missions have fast travel, but that’s not the case for all of them, especially in the late game. If you miss a Slayer Gate, you’ll have to do a whole lot of retreading to get it back. For instance, the Slayer Gate in Mars Core, a mid-game mission, is all the way at the end of the level. If you beat the level without nabbing that Empyrean Key, you’ll have to redo the entire level from scratch—about an hour of work, even for skilled players.
Before you finish any given level, consult the map. If you see any dark purple areas, head back to them. Or, better yet, open up the map after every room you clear. That way, you won’t have to backtrack at all.
Get these runes.
As you play, you’ll come across runes, which offer permanent upgrades that grant Doomguy powerful abilities. There are nine in the game, and you can choose your abilities with each rune, but you can only equip three at any given time. Good thing, then, that only three are worth your time.
Dazed and Confused: When enemies flash orange or blue, that means they’re staggered. You can then run up to them and perform a Glory Kill, an instant-kill melee attack that gives you a health boost and renders you briefly invincible (for as long as the animation lasts, at least). The stagger window is generous enough, but equipping this rune practically doubles it.
Seek and Destroy: At the start, you have to be relatively close to staggered enemies to perform Glory Kills. With this rune, you can close impressively large gaps. It might not sound all that helpful, especially since Doomguy has a useful dash that can close the distance fast. But if there’s an impassable hoard of demons between you and a staggered enemy, this rune allows you to essentially teleport to the other side.
Chrono Strike: With this rune, pulling the left trigger in midair puts the game into slow-mo. Since the left trigger also activates weapon mods, that means using any weapon mod in midair creates a sort of makeshift bullet time. Put another way: you can enter the Matrix by hopping around like a Mario brother. This is especially helpful for powerful weapons that require charging, like the ballista’s Destroyer Blade. It’s also perfect for the Meat Hook; the slow-mo makes level traversal an easier, more precise art.
You can turn off the hand-holding settings.
When you come across a new enemy type, you’ll see a pop-up window offering up some tips for how to beat the beasts. Some players might find this irritating and may believe that it takes away from the classic Doom experience of banging your head against a wall while trying to figure out how the hell to defeat a novel demon. For such masochists, here’s a heads up: You can turn this off by opening up the game’s settings and deselecting “Tutorials.”
You can also turn off “Glory Kill Highlight.” When this setting is on, demons will flash when you can perform a Glory Kill on them. Turn it off, and they’re still susceptible to Glory Kills, but the game just won’t signal that to you like an overactive air traffic controller. It’s yet another tweak that makes gunfights more challenging beyond simply ramping up damage ratios and enemy aggression.
Don’t instinctively go for the one-ups.
Certain levels have hidden one-ups that give you a second chance at life. In Doom: Eternal, they activate immediately upon your death, so you don’t need to restart rooms or fights or anything like that. You pop up right where you’re standing. They’re extremely useful, but you shouldn’t go for them, at least not right away. Using a one-up means it’s gone for good. Even if you die, it won’t respawn on the map.
When you see a one-up, that almost always signals a big fight on the horizon. In these cases, it’d behoove you to run into the next room, dip your toes into the fight, make note of the enemies and waves and power-up locations, and let yourself die. After you respawn, circle back, grab the one-up, and try again. Now, you’ll have an extra life and the lay of the land in your corner.
Spend your Sentinel Crystals on Loot Magnet.
Sentinel Crystals are unlocks that grant Doomguy passive, permanent bonuses. Each bonus requires two crystals to unlock. (As a bonus bonus, each crystal you spend will also increase your health, armor, or ammo meters.) There are six such passives, but you should go for Loot Magnet as soon as you can. Without it, you pretty much have to walk directly over resource drops to pick them up. The Loot Magnet will pull them toward you from a generous distance. In the late-game firefights, where things get more hectic than an early-state caucus, you’ll be glad you got the upgrade.
You can find upgrades in your base.
As you complete challenges, you’ll unlock Sentinel Batteries. In the Fortress of Doom, Doomguy’s Metallica-themed extraplanetary apartment, there are various energy doors gating off extra unlocks. It costs two Batteries to open each door. This might be painfully obvious to some players, but it wasn’t to me, so I’ll share: some of those rooms hold tangible upgrades, like weapon mods and Sentinel Crystals.
I recklessly spent some Batteries in the early game unlocking skins for Doomguy. What’s the point of that? It’s a first-person game! There are too few cutscenes in this game for bonus outfits to really matter, plus a lot of them look like cut-rate Rick Owens designs, anyway. Instead, I should’ve visited the back room of the Fortress of Doom, where there’s a pirate’s booty of essential upgrades.
With cracked walls, pay attention to the colors.
Since this is a Doom game, one key manner of traversal involves punching holes in things: namely, cracked walls. But the color of the crack signifies more than simply “go here.” Green cracks are walls you need to break for story progression. Black walls hide secrets and optional unlocks. Yellow cracks mean you need to find something in the environment—say, a giant laser beam—to shatter them before moving forward.
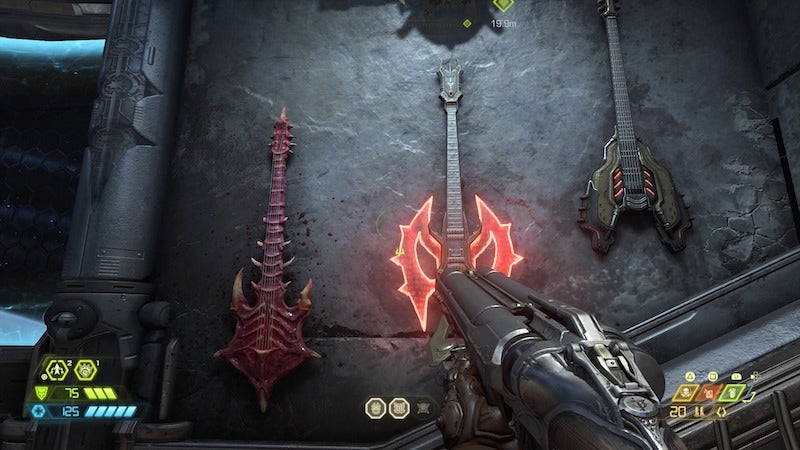
There’s a guitar wall in the Fortress of Doom.

This isn’t a tip. I just wanted to point out how freakin’ metal this game is.
More demonic slaying:
https://kotaku.com/playing-doom-eternal-is-actually-self-care-1842426854
https://kotaku.com/in-hell-all-fonts-are-the-size-of-doom-eternals-1842430711
https://kotaku.com/why-cant-the-doomguy-break-windows-1842428968


