This ain’t Shulk’s first rodeo. Xenoblade Chronicles first came out for the Wii, and was then ported to the 3DS not long after. Now, on Friday, Monolith Soft’s beloved side-quest compilation lands on Switch as Xenoblade Chronicles: Definitive Edition. It’s a prettier, fine-tuned version of one of the great role-playing games of a previous generation. Don’t look now, but this time next week, there’s sure to be a whole new fan club for Shulk, Dunban, and friends (who aren’t Reyn).
But while adventuring among its sweeping fantasy vistas, fans both new and old might find themselves vexed by the convoluted battle HUD. It is, every so often, an unmitigated disaster. You saw that GIF up top, right?
Compared to the prior two versions, a lot of the pertinent info—including enemy health bars and status effects—has been moved to the HUD. As a result, in the middle of a battle, the screen gets ridiculously cluttered. Trying to figure out exactly what’s happening at any given moment can feel like trying to figure out who’s saying what in a 16-person video call. Whether it’s your first, second, or fifteenth go-around with Xenoblade Chronicles, you’re bound to find yourself wondering what in the Bionis is going on. The following annotated guide will help clear up (most of) the mystery.
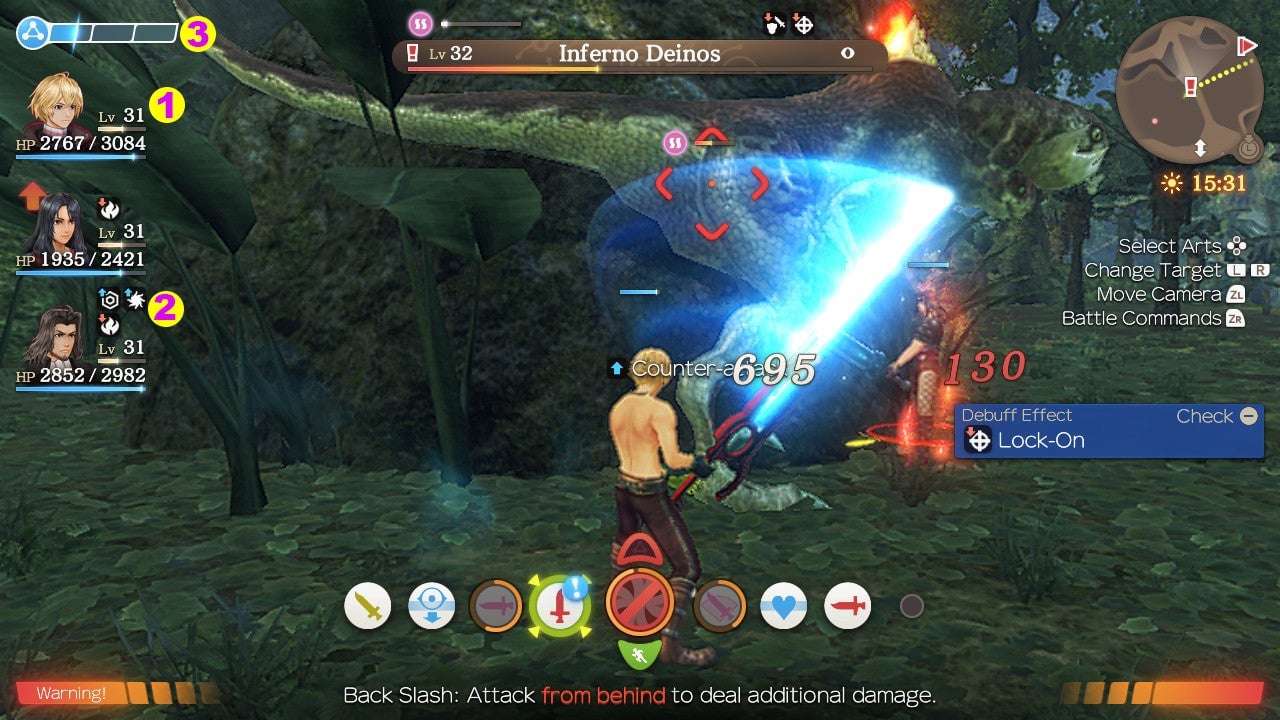
On the left, you’ll see the three characters in your party [1]. This info is fairly straightforward. The larger bar shows that character’s health (also indicated numerically). Since health levels in Xenoblade Chronicles vacillate like a metronome, it can help to pay attention to shifts in color rather than shifts in numbers. A blue health bar is nothing to worry about, a yellow one means trouble, and a red one means a character is on the brink of death (or already down). The smaller light-yellow bar directly below the character’s level is the EXP bar. You know how that works.
See those black icons [2]? Those are any buffs or debuffs currently affecting your characters. Buffs, like Agility Up or Regenerate, are indicated by blue up arrows, while debuffs—including Sleep, Bleed, and Chill—display red down arrows.
The blue bar on top of all that is the party gauge [3]. As you fight, you’ll fill up its three segments. Landing critical hits or bonus effects—when an Art has an additional perk, like a debuff or increased damage from behind—boosts it. When you fill up all three segments, you can trigger a Chain Attack (more on that in a bit).
The party gauge also determines whether or not you can revive a fallen comrade. If one of your teammates runs out of HP, just walk up to them and press B. This will use up one full segment of the gauge. And if you go down, one of your AI-controlled teammates will come over to do the same for you—so long as you have one complete segment in your party gauge. Otherwise, it’s game over.
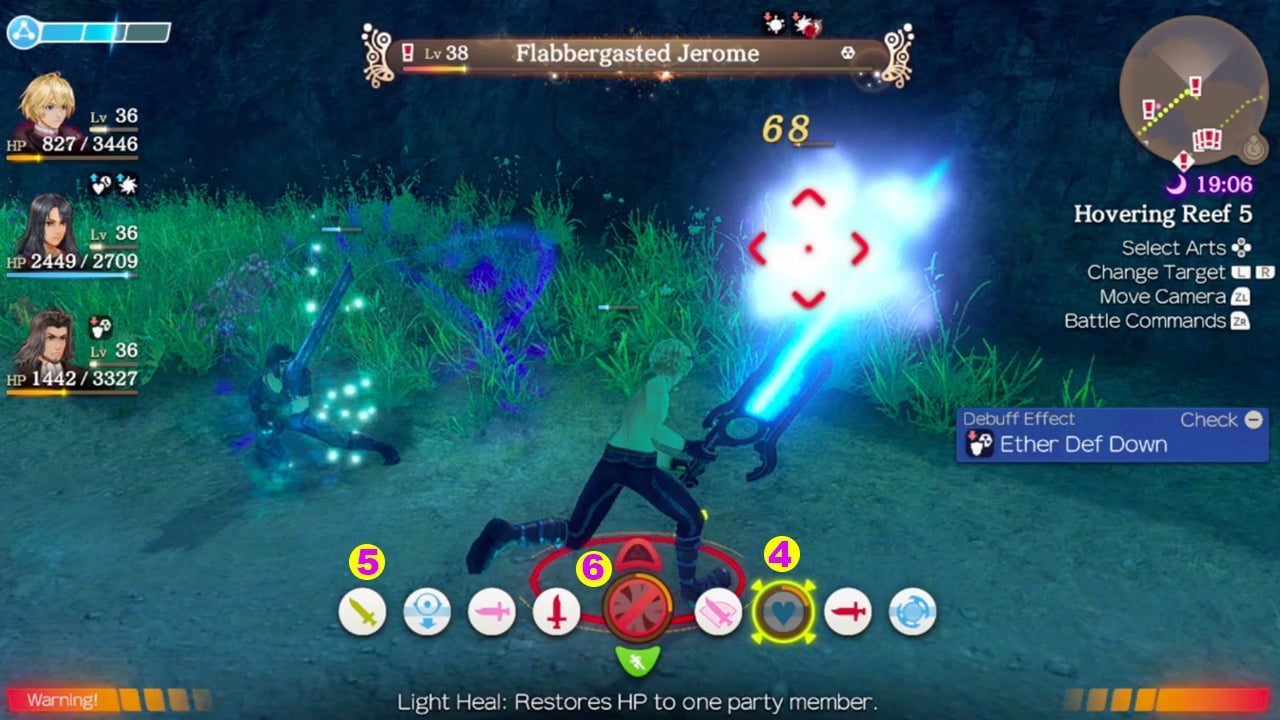
Your Arts (that’s Xenoblade Chronicles for “attacks”) are located at the bottom of the screen. A grayed-out icon [4] means you can’t use that particular Art, either because you’re too far away from your target or because that move is on cooldown. If the Art’s icon is surrounded by an orange gauge, that means it’s just on cooldown. If not, try repositioning yourself.
If an Art’s icon has a bright white background [5], then you’re free to use it. Arts are largely color-coded as follows:
Red Arts are physical attacks.
Blue Arts are Ether-based (magic) moves: summons, healing spells, things like that.
Purple Arts are also Ether-based, and will inflict debuffs or status effects on your target.
Orange Arts are auras, which generally give a character some temporary combat upgrade, like increased evasion or critical chance.
Pink Arts are Break Arts. Use these to inflict the debuff Break on an enemy. You’ll need to do that before inflicting them with Topple.
Green Arts are Topple Arts. Toppling an enemy knocks them over, into a state where they can’t move or attack for a few seconds. A Toppled enemy is wide open to positional-based bonus effects.
Bile yellow (it’s the closest color!) Arts are Daze Arts. Toppling an enemy can give you an edge in battle. Dazing one can completely shift the tides. A dazed enemy’s aggro won’t go up, meaning your low-HP, high-attack characters can deal some serious damage without risk.
Talent Arts [6], the icons smack in the center of any character’s Arts bar, operate on a slightly different set of rules. These high-powered, character-specific moves don’t have a cooldown. Rather, to use one, you’ll have to fill up the Talent gauge—also an orange gauge surrounding the icon—by connecting auto-attacks (the game’s basic attacks, which just happen without your input). While you can customize any character’s Arts bar, you’re stuck with Talent Arts. The good news: Talent Arts can link up with any other Arts in Chain Attacks (again, be patient, we’ll get to those).
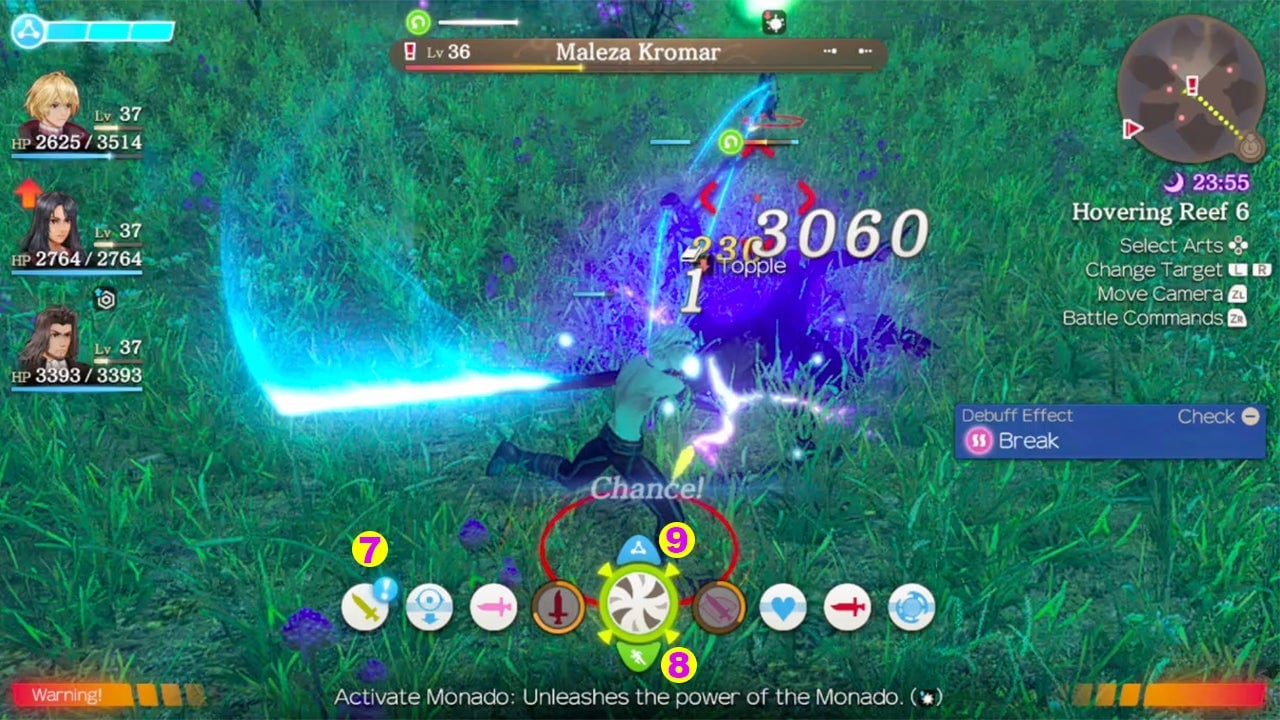
When an Art is marked by a blue exclamation point [7], that means you have a “Chance!” and can trigger a bonus effect, if you act quickly. Maybe that means an enemy is Toppled and thus susceptible to Dazing. Maybe that means Shulk’s Back Slash will be able to deal double damage, because you’ve positioned him just right behind an enemy. Whenever you see the blue exclamation point, it’s usually a good idea to use that Art.
The center icon, the Talent Art one, is a mini-menu of sorts. You can scroll down to see the run icon [8]. Clicking this will direct your party to stop auto-attacking, at which point you can move to escape. Truth be told, if you want to turn tail from a fight, first off, well, that’s totally fair. A wise, muscular, definitely six-foot-tall warrior knows when a battle is over. Second, you’ll rarely need to use this option. More often than not, in standard battles, you can just turn around and run away. Sure, the other two characters in your party will keep hacking away, but once you get clear of the battlefield, they’ll just teleport to your side.
Scroll up and you’ll see the Chain Attack button [9]. When that glows blue, you’ll be able to spend all three segments of your party gauge to perform a Chain Attack. Time freezes and you select moves for each party member, kind of like you’re playing a turn-based game. Matching Arts by color—say, three red (physical) attacks—will significantly increase how much total damage you deal. You can also mix and match colors to quickly Break (pink), Topple (green), and Daze (barf-bag yellow) an enemy.
If the affinity between two characters is strong enough, you have a chance to set off a Chain Link. A quick-time prompt will show up. Time the button press well—it’s always B—and you’ll execute another attack in the chain. The higher the affinity, the higher your chance of triggering a subsequent Chain Link. You can do this up to 15 times.
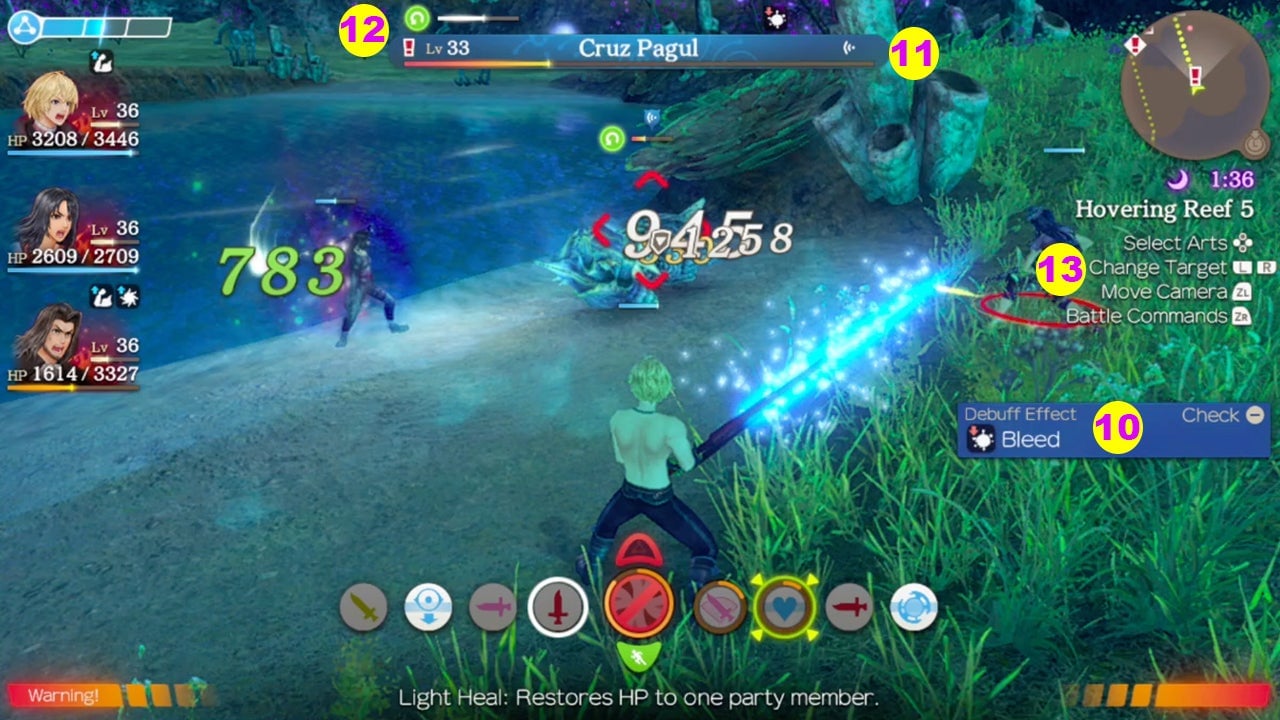
Throughout a battle, unseemly blue blocks [10] will pop up on the right side of your screen. These are notifications for any buffs or debuffs that happen during a battle. You can turn them off by opening up notification settings in the options menu and switching Buff/Debuff Info from “every time” to “first time.”
In fact, you should do that as soon as you’re comfortable. You’ll get a grasp on what each buff or debuff does soon enough, and the torrent of notifications is worse than a Gmail account without the “promotions” filter. So many buffs and debuffs happen during any given battle that, more often than not, you won’t even make it through all of the notifications before the next battle starts. Once you understand things, there’s no need to have that clutter on your screen.
As with Xenoblade Chronicles for the Wii and Xenoblade Chronicles for the 3DS—and also every other game, ever—when the enemy’s health bar [11] depletes, they’re defeated. The thing you really have to pay attention to is whether or not there’s an exclamation point next to the level indicator. If so, that means you need to defeat this enemy to complete a quest. Sometimes, it means they might drop loot required for completing a task. Other times, defeating them is the task. Either way, you know what to do.
Right above the enemy’s health bar you’ll see their status effects [12]. Information about buffs and debuffs is on the right, and works functionally the same as it does with your party. The stuff on the left is the truly important info. When that field populates, you’ll see a circular icon in one of three colors. This icon will indicate one of three status effects: pink (Break), green (Topple), or putrid yellow (Daze). A white meter will appear and slowly start to run down. If you want to Topple an enemy, you’ll have to use a Topple Art before the Break bar runs out. If you want to Daze an enemy, you’ll have to use a Daze Art before the Topple bar runs out.
On the right, directly below the map, you’ll see the battle controls [13]. You can cycle through targets (L and R) and play around with camera angles (ZL). The most important thing you can do, though, is issue battle commands (ZR). Xenoblade Chronicles doesn’t give you the luxurious level of control you’d find in, say, a Tales game, but you can at least offer some general guidance. “Focus Attacks” cause the whole party to pile onto whomever you’re targeting, and it’s easily the most helpful direction in battle. Most game overs are a result of getting overwhelmed by an unmanageable horde of foes. Taking out baddies one by one makes those hordes a bit more manageable—and, at the very least, removes some of that damn screen clutter.
Of course, there’s more to Xenoblade Chronicles: Definition Edition’s battle system than the HUD, uniquely jam-packed as it is. As you play, expect to see no less than 100 pop-up tutorial windows. Or, if that’s too much to parse through, worry not: In the coming days and weeks, we’ll continue to offer tips, tricks, hints, and hacks for tackling this Bionis-sized game.
Related Stories:
https://kotaku.com/xenoblade-chronicles-definitive-edition-makes-an-excel-1843437384
https://kotaku.com/lets-compare-xenoblade-chronicles-wii-and-switch-graphi-1843126384

