Warzone’s new 2.0 release updates Call of Duty’s much-celebrated battle royale (and it is a very fun time), but there’s also a new mode: DMZ. Here, the pace and goals are quite different, despite taking place on the same map as Warzone’s BR. The goal of this mode is to exfiltrate with as many goodies as you can. To facilitate this, you can take on missions, contracts, and other activities to increase the rewards you’ll receive upon successful exfiltration, in addition to looting buildings and storage containers. Your opposition includes tough AI opponents, high in numbers with keen eyes and a sharp aim, and other players out on the field. There’s no closing circle, but you only have 25 minutes per deployment. If you die, you lose everything you have on you, including your weapons and any mission-sensitive items and valuables.
If you’ve played games like Escape from Tarkov, then DMZ won’t be too unfamiliar to you. Importantly, if Tarkov and other extraction-based survival games have been too overwhelming for you, DMZ offers a slightly more streamlined version of the “get in, loot, get out” loop. But don’t be fooled. Poor planning and reckless behavior will be punished via death before you know it. In my opinion, DMZ offers a delicate dynamic of anxiety and excitement that’s very exhilarating, challenging, and rewards repeat successful runs (despite many, many, many frustrating crashes that have prematurely halted mine and others’ progress).
DMZ requires a careful balance of planning and smart choices out there in Al Mazrah. You can’t prepare for every foreseeable outcome, but making the right choices both before heading out and while on the field can mean the difference between a successful exfiltration and a punishing defeat. DMZ is very different from playing a battle royale, so you need to be prepared.
Like Warzone, DMZ is free to play. The main menus of Modern Warfare II can be tricky to navigate, though. Be sure to select DMZ from the bottom row of the main menu, right before Battle Royale. For now, DMZ is in beta, so this guide may change to reflect updates to the mode. But don’t wait until a more polished version of this mode to get in, because there’s a ton of fun and challenge to be had here. Once you’re in, here’s how to play DMZ.
DMZ weapon and equipment loadouts
DMZ is still Call of Duty, so guns and equipment are absolutely essential. But unlike other Call of Duty modes, you can very easily end up on the battlefield with just your fists if you aren’t careful.

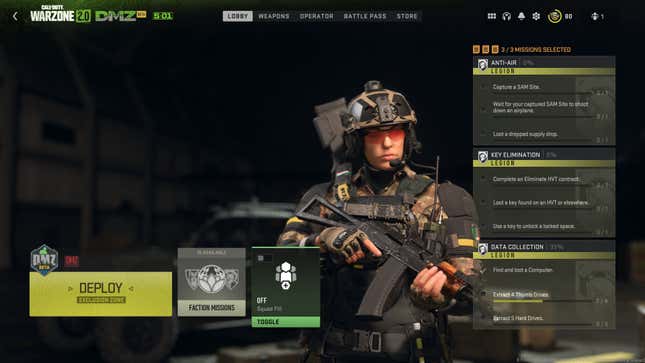
The big yellow “Deploy: Exclusion Zone” will walk you through the two necessary steps before heading out, but you can also configure this stuff manually, and you should. Everything in DMZ is about intentional decision-making.
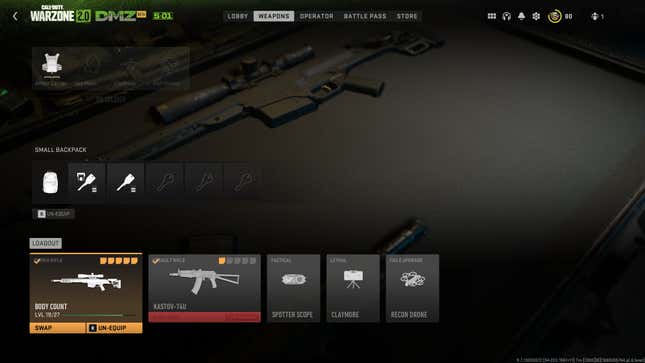
Select the Weapons tab to start configuring your loadout for DMZ. Time will tell what guns are best for this mode, especially as it’s still in beta, but you need to make sure you’re equipped with weaponry no matter what.
The loadout screen for DMZ looks a bit different from typical Call of Duty weapon and equipment selection screens.

At the top you’ll see the “On Soldier” selection of equipment. Here you can view what armor carrier and killstreaks you’ll have recovered from previous runs, as well as a gas mask and a Self Revive (we’re gonna talk a lot about Self Revive in a bit because it is pretty essential). If you don’t have anything equipped right now, it’s because you don’t have it; you’ll need to head out to Al Mazrah to recover these resources. You will always start out with at least a one-armor carrier, though you can eventually deploy with two- and three-armor vests once you recover them on the map. Same goes for gas masks, killstreaks, and Self Revive.
Next up is your backpack. You will deploy with a small, medium, or large backpack, depending on what you recovered on your last run. In the loadout screen you can choose what keys you want to take with you. Keys will let you unlock strongholds, which may tie into some of your missions, but also provide opportunities to get some good loot.
There are, broadly, two types of guns in DMZ: contraband and insured. Contraband weapons include anything you recover from Al Mazrah after a successful extract. These include weapons you find in the field from fallen AI opponents and from enemy players. If you find a contraband weapon with some great attachments, hang on to it to use it in future missions. Any contraband weapons you lose from dying (or crashing…) while playing will be lost. If you run out of all contraband guns, you can use an insured gun or, though it isn’t always available, a choice of random weapons assigned to you on loadout.
While you can’t customize contraband weapons, you can customize insured weapons. Insured weapons take up one of three slots. You won’t lose insured weapons if you die with them, but their slots will be on cooldown for a certain amount of time if you do. You can unlock more slots by making more progress with faction missions. Like with Warzone, your ability to equip modifications to insured weapons is based on the progress you’ve made with each gun in either the battle royale mode, or any of Modern Warfare II’s multiplayer modes. You’ll start out with one insured weapons slot. Pick one you’ve leveled up already so you have greater access to weapon modifications or tuning.
Finally, you’ll have a choice of tactical and lethal equipment, as well as a field upgrade. There’s a limitless supply of these, so don’t worry about losing them from death (or needing to extract with them). You should always head out with tactical, lethal, and field upgrade equipment. It’s foolish not to. Personally, I default to taking either a spotter scope or heartbeat sensor, claymores or proximity mines, and a recon drone as a field upgrade. Your mileage may vary, but I like to play rather stealthily and find great utility from these.
DMZ factions and missions
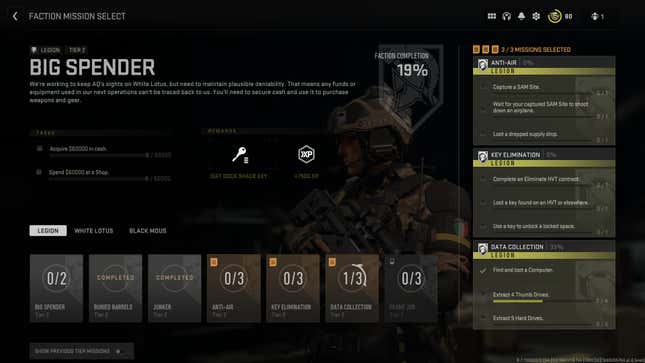
DMZ has three factions you can complete missions for, each broken up across three tiers. While the loop of survival in DMZ is rewarding all on its own, maxing out your faction completion percentages is the main progress you’re chasing in this new mode.

You can deploy with as many as three active missions at a time. You can either choose these as you prep for deployment (by pushing the big yellow button) or by selecting “Faction Missions” next to the deploy button. Like with weapons, it’s possible to deploy without any missions active. You aren’t punished for exfiltrating without accomplishing a mission, so there’s really no reason not to have all three missions slots filled.
You can select which faction you wish to complete missions for with the tabs on the lower left portion of the mission select menu. Each mission lays out its objectives and shows you what rewards you’ll get upon their completion. Some missions, like one where you need to destroy six vehicles, don’t require exfil for completion. Others, like exfiltrating with hard drives recovered from the field, obviously require a successful exfil.
It may not be obvious, but completed missions won’t leave a slot once you’ve cleared the objectives. Swap out completed missions for new ones.
DMZ matchmaking and squad size
Firefights in DMZ mostly take place between players and hostile AI. But there are a bunch of other players on the map with you at any given time. While you’re free to go out into the map on your own (this can be very risky, but I find the thrill of venturing out into the world without backup to be worth it), you can choose to go out with two other friends as a squad of three, or select Squad Fill to matchmake with two random players in your squad on the main menu.
Teamwork and communication in DMZ are arguably more essential than in any other mode in Call of Duty. Differing objectives, resource management, and a choice of how to proceed through enemy territory are too demanding to go out with little communication, so either choose to go out with two friends you can work together with, get on voice or text chat with randos, or prepare to go out on your own if you don’t want inexperienced or under-equipped players to weigh you down too much. A poorly functioning squad is a dead squad that won’t get to the LZ for exfil, leaving behind all the stuff the three of you have fought hard to secure. If you’re playing with folks you know, it’s not a bad idea to live up to the mil-sim aspects of Call of Duty and designate one person in charge of where you go, when you open fire, and when you retreat. A marching order for decision making will go a long way out there.
DMZ looting contracts, strongholds, and other activities in Al Mazrah
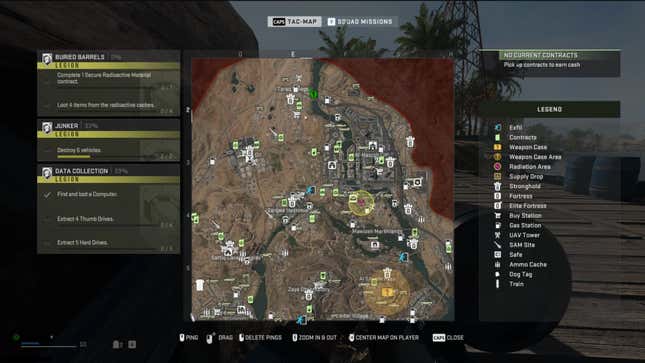
Your tactical map (Caps Lock/M on keyboard, Select on controller) is laid out much as it is in Warzone’s battle royale. Some icons are even the same, such as ammo resources and Buy Stations. Contracts, though bearing some similarities, have different objectives.

Some contracts, like securing nuclear materials, require you to locate a Geiger counter first, then march out to specific areas to recover valuable nuclear materials you can either sell for cash at the Buy Station (allowing you to equip better gear) or exfil for more XP.
Like in the battle royale, contracts are indicated with a green walkie-talkie symbol. You can almost guarantee that contracts will take you through areas populated with enemy AI, so be equipped for possible gunfights if you’re looking to fulfill contracts.
You can also take control of UAV radio towers and SAM launchers. These are indicated by a radio tower and missile icon on your map, respectively.
Strongholds are indicated by a castle-like icon on the map. You’ll need a key to enter these, which you can either buy at a Buy Station or secure from fallen enemies surrounding the stronghold. Inside you can find better weapons, as well as mission-specific intel.
There are a number of other valuables to secure and contracts to take on out there in Al Mazrah, so be sure to check your map, as well as listen for updates, as you move through the map.
You can also unlock weapon blueprints in the DMZ.
Finding the M13B weapon blueprint
The DMZ currently has an exclusive weapon, the M13B assault rifle. Once secured, you can use it across Modern Warfare II; that includes the main multiplayer as well as Warzone’s BR.
To acquire this blueprint, you’ll need to defeat the Chemist boss in the irradiated area, indicated on your map by a yellow circle with a purple nuclear sign in the middle. The Chemist is pretty tough, so you don’t want to go in alone or underequipped.
Only one person per deployment can acquire this blueprint. But worry not, there’s a pretty straightforward way to give the weapon to your squad members. After you’ve successfully exfiltrated with your own M13B, it will be unlocked and you can place it in your insured slot. Take it back out onto the field and drop it from your inventory to give it to another player. If that player exfils with the gun you just gave them, they’ll unlock the blueprint. You can repeat this as many times as you’d like. While it negates having to defeat the Chemist three times, there’s still the challenge of successfully exfiltrating, which isn’t always a guaranteed success.
General DMZ tips
DMZ rewards patience and strategic planning. If you’re looking to run and gun out there on the field, you will likely die and will lose a ton of hard-won items. DMZ is all about preserving momentum on subsequent runs by continuing to gather gear. Sloppy playing will result in a spiral of deaths round after round, and you’ll lose whatever you’re carrying each time.
For starters, don’t engage in unnecessary gunfights with the AI. A lone AI might seem innocent enough, but if you’ve got a loud weapon and you open fire, you might come to find out they’re not alone after all. Entire swarms of enemy AI can come out of buildings, enter the fight via helicopter or ground vehicle, and very, very easily kill you. Be careful even when trying to flee enemy encampments. The AI is more than capable of killing you and ruining your progress. Same goes for enemy players.
Like other modes in Warzone, you can in fact squad up with enemies. Simply hold down the ping button to bring up the option to send out an invite or request an invite.
On that note, it’s not wise to openly start fights with other players. They may very well have better equipment than you and can make your trip through Al Mazrah quite miserable. It’s also common for enemy players to observe Buy Stations, ammo reserves, and exfiltration zones just as they do in the BR. Choosing to exfil will alert nearby players, so stay on your guard until you’re safely up in the air and are actively heading out.
One small mistake can lead to a set of disasters. First you might catch the attention of hostile AI or enemy players. Then you might start taking shots. Armor plates aren’t as plentiful on the field as they are in the BR, so you might run out fast, with just your precious, fragile health to live on. Ammo can also be a little sparse. Before you know it, you’ll be swarmed and killed. Plan at least a few steps ahead. Observe the environment. Make smart use of recon drones or scopes. Communicate openly with your team, but watch out for proximity chat.
Personally, I avoid all gunfights until I have at least a two-armor plate vest and a Self Revive. I also don’t take on any contracts unless I’m with a team or am extremely well-equipped (three-plate armor vest, fully kitted-out guns, Self Revive equipped). On that note, you must equip Self Revive manually. It’s easy to mistakenly put it in your backpack, where you can’t use it if you’re downed.
Also, stop sprinting all the time. Save your tactical sprint for when a situation is FUBAR. And, PC players, consider assigning “Walk” to a key. It’s not bound by default. Since Ping is double bound to Left Alt and the middle mouse button, I just assign Walk to Alt (no toggle for me) and call it a day. Or you could use a controller for analog movement, but then you’d sacrifice mouse aim. It wouldn’t be a bad idea to have a controller player take point, stealthily moving into an area and taking advantage of their more nuanced movement controls while a keyboard and mouse player covers them with a sniper. This kind of tactical planning and role assignment is one of the most promising and exciting things about DMZ, so have fun!
Keep an eye on your party’s equipment. There’s no use dragging someone with a one-plate armor vest and a pistol into a stronghold. You can endanger your squad’s life just as much as your own, potentially causing you and your team to lose all of their loot. Plan smart based on what you and everyone in your unit currently has. And if you’re out there on your own, plan for short supply runs to stock up on guns and equipment.
DMZ can be a tough experience, but the challenge of staying alive and getting out on time is well worth it. I’m enjoying heading out with friends, but also going in solo with a silenced sniper rifle. It’s the Sniper Wolf fantasy I’ve always dreamed of.
Head out there fully stocked, with missions to take on, and with smart, strategic planning, and you’ll soon be pooling together a ton of great resources to earn even better loot on subsequent trips.