When I think of the toughest games of my childhood, the Ghosts ‘n Goblins series from Capcom immediately comes to mind. They’re unforgivingly difficult, taunting you at each corner with a thousand deaths. Arthur’s armor gets shredded by every moving object and even upgraded weapons offer little protection. What’s worse is that you have to beat each game twice, which might mean double the fun, or pain, depending on your tolerance threshold for thumb-numbing suffering.
But the series also has some of the most devilishly tricky levels in gaming. As part of my ongoing series examining some of my favorite levels in gaming, I’ll be looking at the nifty mode 7 graphics of Super Ghouls ‘n Ghosts’ Stage 4.
The Ghouls’ Stomach
There are games that are difficult because they are badly designed. Then there are games that are intentionally crafted to be soul-crushing experiences inducing controller destruction. Super Ghouls ‘n Ghosts is one of the latter. The Super Nintendo version was the third game in the series and the first not to be an arcade port. Even though it wasn’t designed as a quarter cruncher, Capcom made sure it still felt like one.
In a small concession to the game being designed for the console, Capcom did give players a new ability: the double jump. It made surviving a little more manageable. But to be completely candid, that “aid” is just an illusion because the ability to double jump results in some excruciating new obstacles requiring perfectly timed leaps to survive.
There’s also armor upgrades that allow players to charge their weapons and fire magical attacks, along with a shield upgrade that protects Arthur from projectiles. Obtaining them is difficult because one stray hit, regardless of if you’re wearing bronze or gold armor, will immediately take you back to underwear Arthur. But you’ll need to collect all the help you can get as its get difficult, whether you’re jumping from raft to raft amidst the turbulent tidal waves in the Sea of Despair, or trying to stay warm in the desperate cold of the Deep Chill.
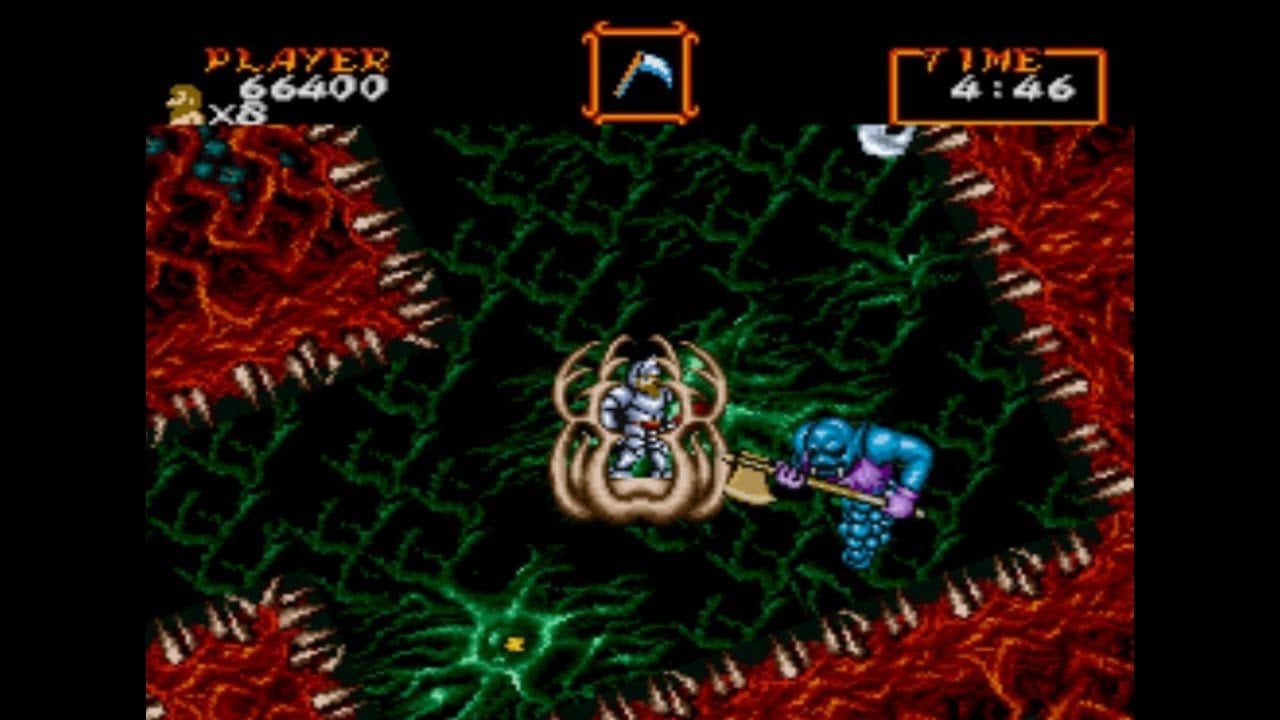
A lot of geographic displacement takes place in the game, like the ever shifting hills in the opening stage. Stage 4 takes that to another level with the entire background rotating in place. Known as the Ghouls’ Stomach, it is one of the creepiest levels in the game.
It’s also remained indelibly one of the most memorable for its use of Mode 7, the graphics mode that allowed the scaling and rotating of background layers. Scattered across the ground are fang-like spikes and the walls look like chemically doused brain matter. When Arthur jumps onto one of the specific platforms, a cage of bones surrounds him, trapping him within. That’s when the entire stage spins and blood oozes through the walls, a flashing effect makes the disorienting turn even more disturbing. I thought it was the coolest thing in the world when I first saw it. Super Castlevania 4 had a similar effect on one of its levels, but the organically disgusting nature of the Ghouls’ Belly lends itself to a stronger effect.
Through the section, Genie Ghouls hunt Arthur down and Green Skull Flames fire up to try and impede him from getting to the next platform before the room spins again. If Arthur can’t reach it in time, spikes emerge from the ground and impale him. In this chamber of gruesomeness, up, down, left, and right ultimately have no meaning.
The second half of stage 4 has Arthur riding a platform made out of blood organs. It moves in random swings as it’s unable to keep steady in the chaotic channel of the belly. Monstrous circular globs sprout in mid-air and steam geysers out of the aorta field surrounding Arthur. Obstructions come at a steady pace as the globs grow where they’re most likely to harm. The miniaturized version of the blue devils add to the tension (while they’re cool in Gargoyle’s Quest, they caused a whole lot of gaming trauma in the original Ghosts ‘n Goblins and the sight of them, even in their smaller form, evoked trepidation and sweat). Arthur has to jump onto new platforms when they form and move from one end to the other to avoid death from the globs and steam attacks. The atmosphere oozes with an uncomfortable sense of horror and disgust. Hell isn’t just torture and punishment, but a series of quick deaths that you have to play over and over again.
There is no safe spot in either section. Everything is in flux. The music intensifies the sense of anxiety with higher pitched beats and a sense of ominous foreboding. “The hills are alive with the sound of mucus,” a friend, Comet, said. The level as a whole constantly forces you to move forward without knowing where it might take you. Being too cautious almost certainly leads to death by acidic digestion. And while all the other levels have their share of dangerous enemies and difficult pits, this is one of the few where the environment is actively trying to murder Arthur.
In the final fight against the Hydra, it looks like you’re in a morass of snot. As you’re wading through the phlegm, the three-headed Hydra slithers out. It spits fireballs at Arthur and transforms into three separate creatures when it wants to swap sides. After you take out each of its heads, a key helps Arthur escape out into the freezing cold.
The best part, of course, is you have to play through the entire level twice.
